Blog 10-20-22
1 Umami
Umami is an open source, privacy-focused alternative to Google Analytics. I’ve known about Umami for a while, but I haven’t had a chance to use it until now.
First, let’s install Umami.
1.1 Installation
Requirements
- A server with Node.js version 14 or newer
- A database. Umami supports MySQL and Postgresql databases.
Depend on your server Linux OS, I’m using Cent OS (version 7.9) at the time of writing this post.
1.1.1 Install Node Using the Node Version Manager
To install NVM on your CentOS 7 machine, visit the project’s GitHub page. Copy the curl or wget command from the README file that displays on the main page. This will point you towards the most recent version of the installation script.
curl https://raw.githubusercontent.com/nvm-sh/nvm/master/install.shTake a look and make sure you are comfortable with the changes it is making. When you are satisfied, run the command again with | bash appended at the end. The URL you use will change depending on the latest version of NVM, but as of right now, the script can be downloaded and executed by typing:
curl https://raw.githubusercontent.com/nvm-sh/nvm/master/install.sh | bashThis will install the nvm script to your user account. To use it, you must first source your .bash_profile:
source ~/.bash_profileNow, you can ask NVM which versions of Node it knows about:
nvm list-remoteYou can install a version of Node by typing any of the releases you see. For instance, to get version 16.18.0, you can type:
nvm install v16.18.0You can switch between them by typing:
nvm use v16.18.0You can verify that the install was successful by typing:
node --version1.1.2 Install Yarn
npm install -g yarngit clone https://github.com/umami-software/umami.git
cd umami
yarn install1.2 Configure umami
Create an .env file with the following:
echo 'DATABASE_URL=postgresql://username:mypassword@localhost:5432/mydatabase' > .envDATABASE_URL=postgresql://username:mypassword@localhost:5432/mydatabase
(Read Postgresql Database for more information)
Note: Replace localhost with <server IP> in case you plan to access this database from a remote connection.
1.3 Build and Start the application
yarn build
yarn update-db
# This will also create a login account with username admin and password umami.
yarn start
By default this will launch the application on http://localhost:3000. You will need to either proxy requests from your web server or change the port to serve the application directly.
:(fas fa-lightbulb): Since my VPS is also running my webserver, it doesn’t have extra resource to run framework Next.js. Hence, I use the option to deploy Umami application on Vercel and link to this Postgresql Database on my VPS.
1.4 Postgresql Database
Umami needs a database server running and accepting remote connections. You can check the following guide to install Postgresql on CentOS:
https://www.digitalocean.com/community/tutorials/how-to-install-and-use-postgresql-on-centos-8
Check if Postgresql is running
sudo systemctl status postgresql-14(postgresql-xx with xx = 14 is the current version of Postgresql on the system).
Accessing a Postgres Prompt Without Switching Accounts
sudo sudo -u postgres psql -p xxxx(xxxx is specialized port if it’s not using default port 5432)
You can exit the interactive Postgres session by typing:
\qCreating a New Role
createuser --interactiveIf, instead, you prefer to use sudo for each command without switching from your normal account, type:
sudo -u postgres createuser --interactiveOutput
Enter name of role to add: foxdie_one
Shall the new role be a superuser? (y/n) yUse \du or \du+ psql command to list all users in the current database server.
To add the password:
sudo sudo -u postgres psql -p xxxx
ALTER USER user_name WITH PASSWORD 'new_password';
Creating a New Database
Inside psql command, type:
create database umami;And remember these are the three magic commands:
CREATE DATABASE yourdbname;
CREATE USER youruser WITH ENCRYPTED PASSWORD 'yourpass';
GRANT ALL PRIVILEGES ON DATABASE yourdbname TO youruser;
In order to allow all the IP addresses to connect to the PostgreSQL server, we need to configure the file and make some changes, for that you have located the configuration file in the previous step.
Configuring postgresql.conf:
sudo nano /etc/postgresql/14/main/postgresql.conf This command will open this file and in it, you need to search listen_addresses and add the following line.
#listen_addresses = 'localhost'
listen_addresses = '*'
All you’ve to do is change the listening address from localhost to “*” or add a new line as shown above. This will allow every IP address to be connected to the database server, or if you want to specify some particular ips you can type them with spaces between each IP address.
Configuring pg_hba.conf:
In order to allow the users that we want to be connected to the database then we need to make changes in the “pg_hba.conf” file. This file will be available under the same directory as above.
sudo nano /var/lib/pgsql/14/data/pg_hba.confIn the file you’ve to add the following lines in file:
# TYPE  DATABASE	USER	  ADDRESS   	  METHOD
host    all     	all     0.0.0.0/0       md5
host    all       all     :/0             md5
Save the configuration file and close it. Now, restart your database by executing the below given command:
sudo systemctl restart postgresql-14To check if the database is running:
netstat -plant | grep 5432After completing installation and creating a new user and database, the only thing left to do is verify the connection to your server’s IP address and port (default 5432).
If you’re using Windows, just open Powershell and use this command:
Test-NetConnection <server IP> -p 5432
# TcpTestSucceeded : True
The phrase TcpTestSucceeded: True indicates a successful connection. If not, you must see if your firewall is enabled, as this could block data transfer through port 5432. For CentOS, Firewalld is the default firewall manager, which you can read this guide for how to set up and basics of managing the firewall:
These commands will be used to open port 5432:
sudo firewall-cmd --zone=public --permanent --add-port=5432/tcp
sudo firewall-cmd --zone=public --permanent --list-ports
2 Deploy on Vercel
- Fork the https://github.com/umami-software/umami project to your GitHub account.
- Create an account on Vercel.
- From the dashboard page click Import Project then specify the URL to your fork of the project on GitHub.
- Add the required environment variables
DATABASE_URLandHASH_SALTto your Vercel project. These values are defined in the Configure umami step from Install. - Deploy and visit your application at
<deploy-id>.vercel.app. - Follow the Getting started guide starting from the Login step and be sure to change the default password.
You fill these values in Settings :(far fa-arrow-alt-circle-right): Environtment Variables:
DATABASE_URL=postgresql://username:mypassword@`<server IP>`:5432/mydatabase
HASH_SALT=somerandomstring (to strengthen the password)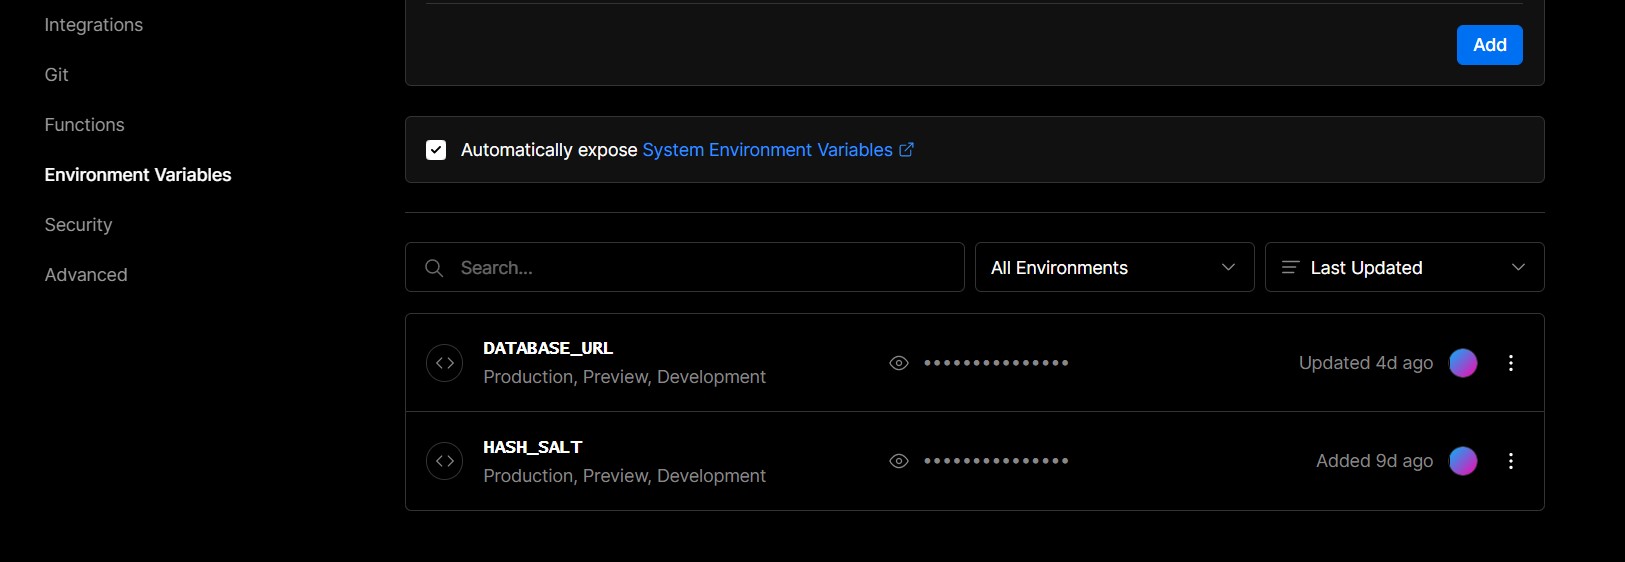
3 Sync your Umami fork with the original repository
After deploying Umami in Vercel, you may like to update to orginal repository, to get newest version.
git remote add upstream https://github.com/umami-software/umami
git remote -v
git fetch upstream
git remote update
git checkout master
git merge upstream/master
git push https://github.com/foxdie987/umami